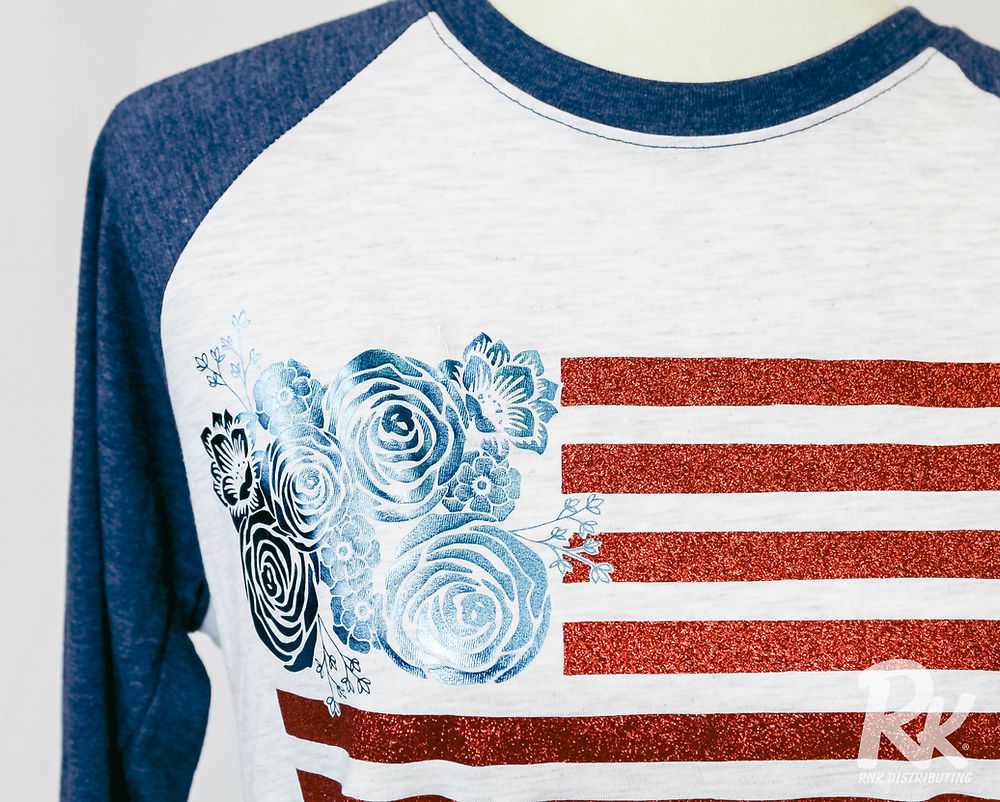
Labor Day Shirt

Labor Day Shirt

This may be the most unique and intricate design Emily has ever made! Are you feeling patriotic? Because this shirt has USA written all over it!

We know, we know, Labor Day has passed right? BUT, think of all the adorable possibilities for this design?! Put it on a pillow, make an embellish blanket, or make a stellar New Years Eve Party Shirt!


All you need to do is line up your design, press the blue flowered portion first and do a cool peel, then align your stripes and press again! Now, of course, we are partial to our HTV. So we used our Embellish foil in the blue, and our Cosplay Power Shine Glitter! This shirt is one for the ages and we hope you love the design too!


Download your free design here:

https://static.wixstatic.com/shapes/5edfbf_a00236405c9c4f938e705f0524e547b2.svg


Patriotic Wreath

Patriotic Wreath

We only have a few #LaborDay projects for you to finish off this fun holiday, and Clarrisa has brought a unique and fun wreath idea for you to create!

Supplies:

  • 18” wide plain wreath. I used a Willow Wreath

  • Glue Gun with glue sticks

  • One outdoor burlap flag. It can be rectangular or pointed at the bottom. The reason it is an “outdoor” flag is because it is lined with plastic

  • A piece of White wool blend felt about 9”x 13”

  • A piece of RNK Deco Magic regular weight about 9”x 13”

  • A piece of Floriani Wet n Stick about 10”x 14” –I used my 200mm x 300mm hoop (8”x 12”) for all the pieces

  • An Envelope Moistener

  • About Twelve-2” wide wood stars

  • Scraps of red, white and blue fabric to adhere to stars

  • A piece of Quilter’s Select Appli-Web Plus about 8”x 8”

  • Parchment paper

  • Floriani “Americana Applique” design set (optional) If you’re into Americana you need this design set. It’s so cute!

  • https://rnk-floriani.com/products/Floriani-Embroidery-Designs/Americana-Applique

  • If you choose to use other designs you will need about 5 different designs. I’ve included 5 designs that I’ve digitized for you to use if you choose. I’ve also included the lettering embroidery designs to spell out USA.

  • Floriani Embroidery thread in colors of your choice. Of course Red, White and Blue is best for this project!

  • Bobbin thread

  • Digital Cutter (optional)

  • 2 pieces of fabric 9”x 12” or equivalent single piece for the bow. (optional)

  • A piece of RNK Deco Magic regular weight about 9”x 12” for bow and 2 pieces of Quilter’s Select Appli-Web Plus 9”x 12” or one equivalent piece (optional)

  • Standard Sewing thread to coordinate with bow fabric

  • A small piece of Floriani Heat n Stay for bow ends

  • An Open toe applique foot for your machine for stitching around bow

Download the full instructions and designs below:

Or watch the full tutorial below!


BBQ Mitt

BBQ Mitt

We are ready for a BBQ this #LaborDay thanks to Kathi Quinn’s latest tutorial!

Supplies:

Two pieces lining/cuff fabric cut 8 ½”X 14” (one for mitt front one for miss back.)

Two pieces top fabric 8 ½”X13

Four Pieces Floriani Embroidery Batting 8 ½” X 13”

Four Pieces RNK Hot and Cold Barrier Fleece 8 ½”X 13”

Floriani Variegated number 30 Red/White/Blue thread.

Floriani Thread to match design.

Cosplay Snips.

Quilter’s Select Glue Stick.

Floriani Wet N Gone Stabilizer.

Floriani Chrome Quilting Needle 75/11.

Floriani Chrome TOP STITCH Needles 80/12.


1. Hoop Wet N Gone in 8”X 12” Hoop or larger

2. Stitch out Mitt front placement lines.

3. Center Lining Fabric wrong side up aligning with top placement line.

4. Add one piece Floriani Embroidery Batting aligning with the top line.

5. Add two pieces barrier fleece wrong sides together

6. Add second piece of Floriani Embroidery Batting

7. Add top Fabric right side up.

8. Stitch out front stopping before last color to fold up binding.

9. Repeat with BBQ Mitt back. After stitching binding. Do not remove from hoop.

10.Pace Mitt front on Mitt back right sides together. CHANGE TO TOP STITCH NEEDLE.

11.Stitch front to back, trim, turn and wash away remaining stabilizer.


Get more amazing tutorials by Kathi quinn at https://pclassroom.blog/

Cupcake Toppers

Cupcake Toppers

Judy has created a fun #diy cupcake topper for everyone to make this Labor day!

Supplies

  • Deco Magic or Stitch N Shape scraps

  • Novelty fabric (washed & dried)

  • Cupcakes or Cookies

  • Iron

  • Scissors

Instructions

  1. Choose a Novelty fabric and rough cut around the design. Do not trim close to design yet.

  2. Fuse fabric to Deco Magic or Stitch N Shape, only 1 layer needed unless you do a oversized topper!

  3. Cut our design, and put on cupcake or cookies. You could also make larger toppers and put on a cake.

  4. If you want to have more fun add other decorations.

  5. After party, simply was the toppers and save for next time.


Labor Day Jean Jacket

Labor Day Jean Jacket


It’s Labor Day Weekend and we have lots of fun projects for you! Here’s one by Clarrisa!


Supplies:

  • A Flat back denim shirt-No gathers or pleats on the back

  • Floriani No Show Mesh

  • Floriani Press n Bond Thread-NEW!Quilter’s Select Appli Web Plus-About 3 pieces 7”x 9”

  • Floriani Embroidery thread

  • Floriani Silver Metallic thread

  • Bobbin thread

  • Floriani “Rainbow” software-NEW!

  • Floriani Tearaway StabilizerScraps of fabric for “USA” applique letters

  • Parchment paper-About an 8”x 10” piece

  • Quilter’s Select Glue Stick

  • Straight pins


Prepare Embroidery:

1. Included in this projectis a video on how the design for the back of the shirt was created. 2. The main design on the back of the shirt was created using Floriani Total Control software and Floriani’s new Rainbow software. Floriani’s Rainbow software is a Stand Alone piece of software which means you don’t need any other software to use it!! It is currently on sale through your local Floriani Dealer. Floriani Rainbow includes all the features of Floriani

Creative Express as well. Here is further

information:https://rnk-floriani.com/products/Floriani-Software/Rainbow

3. The design was first digitized using Floriani Total Control software using artwork that is included in the software. The artwork is found in the “backdrops library”. The icon for the “backdrops library” is located on the top toolbar, about 2/3rds of the way to the right.I made the design


4. Once the design is digitized and then selected, I opened the Rainbow and started creating my color theme.


5. Floriani Rainbow software allows you to change the colorways of any existing design with a couple of clicks. So much fun! In the software there are premade color “themes” or you can make your own color theme. I made a USA color theme for this design.


6. To create the USA Applique Font, I used the “Applique Bean” font in Total Control Software. The Applique Bean font is designed to be a raw edge applique as there is no satin or blanket finish stitch around the outside edge. There is a video included in this project on how to add the satin stitch to the edge of the USA applique.


Follow the remaining instructions on the PDF Below:


Pinwheel’s for Labor Day

Pinwheel’s for Labor Day

Let’s roll into Labor Day with these adorable pinwheels for your yard, camper, or socially distant cookout this Labor Day! Kim Towne has an amazing tutorial below!

Materials:

  • 8 ½” square of cotton fabric

  • 8 ½” square of Embellish® Heat Transfer Foil

  • 8 ½” square of RNK Deco Magic® Lite

  • (1) 3/8” x 12” wooden dowel

  • (1) Furniture Nail (Upholstery Tack)

  • Embellish® Vinyl Weeding Tool

  • Quilters Select™ Rulers:

8” x 8”
8-1/2” x 8-1/2”
3” X 12”
  • Quilters Select™ Rotary Cutter

  • Quilters Select™ Cutting Mat

  • Quilters Select™ Self Erase Marker

  • 1/8” Hole punch hammer


Instructions:

  • Use the 8 ½” x 8 ½” ruler, rotary cutter and mat to cut the fabric, heat transfer foil,and the Deco Magic lite.

  • Press the fabric to the adhesive side of the Deco Magiclite. Then fuse the Heat Transfer Foil to the other side of the Deco Magiclite.

  • Trim down to 8” x 8” using the 8” x 8” ruler, rotary cutter and mat.

  • Use the Self Erase Marker and the 3” x 12” ruler to mark a 4 ½” line from each corner towards the center of the square.

  • Use the rotary cutter and a ruler to cut along the marked line, giving you four triangle shapes pieces that remain attached in the middle.

  • On the right side only of each triangle, make a hole with the hole punch about ½” from the point.

  • Fold each corner towards the center and tack with the furniture nail to the dowel. DONE!These pinwheels are a quick and easy project. Make them in different sizes for all kinds of fun

Halloween Mask

Halloween Mask

We are {sew} excited for it to be Halloween time! Starting this month and through the month of October, we have lots of spooky decor and more for you! Today, Clarrisa has made easy super hero masks for you or your kiddos!

Supplies:

  • 1/8 yard of wool or wool blend felt or a piece 8”x 8”-to fuse the Deco Magic you will need heat and the wool felt can take the heat. Acrylic felt won’t work.

  • A 4”x8”piece of Deco Magic heavyweight

  • 15”-18” of ¼” wide elastic

  • Standard Sewing thread to coordinate with felt

  • Quilter’s Select Glue stick

  • 90/14 Chrome Microtex needle

  • Scraps of Embellish Heat Transfer Foil, Sew much Cosplay Power Shine Foil or Sew much Cosplay Power Shine Glitter. (optional)

  • A piece of Quilter’s Select Appli Web Plusabout 4”x16”

  • RNK embroidery perfection tape

  • Digital Cutter

  • Deep cut blade and holder for your Digital Cutter

  • A piece of Parchment paper about 6”x 10”


Create SVG Files for Cutting:

1. I love using Craft n Cut software for creating my files for cutting. I also love my Craft n Cut software because when I save my cut file, I use a feature called “Save 2 Cut” and I’m guided as to how to set my digital cutter for the Material/Fabric I will be cutting. Attached is a video on how to create your file for cutting.

2. I’m not much of an artist so I searched online for a pattern for the mask shape. I found lots of options for mask shapes. I chose one and saved the file as a .jpg.I’ve included the .jpg so you will have the file to use to create your own mask.

3. I created 2 files for each mask. One to cut the Deco Magic and one to cut the felt. I didn’t want the Deco Magic poking out around the edges so I made the felt SVG files a little larger than the Deco Magic file.


Cut the Deco Magic and Felt pieces:

1. Load your SVG Filefor the Deco Magicinto your Digital Cutter.

2. Change the blade in your cutter to the Deep Cut Blade.

3. These are the settings for my digital cutter from my Craft n Cut software.

4. Keep in mind that you may need to set your Digital Cutter differently. Basically you need to deepen the depth of your blade, increase the pressure on your bladeand slow your cutter down.

5. Deco Magic is rolled on a rollto selland it curls the Deco Magic. When putting it on your cutting mat you want it nice and flat. Roll the Deco Magic the opposite direction of the curl from the roll. Roll it as tight as possible to flatten it out.

6. When using your Digital Cutter to cutthe Deco Magic, make sure to generously tape the Deco Magic around all sides to the cutting mat using RNK EmbroideryPerfection Tape.Cut only one mask at a time.

7. Cut 2 pieces of felt 4”x8”or use a single piece 8”x8”. Fuse a piece of Quilter’s Select Appli Web Plus to each piece of felt.The Appli Web Plus gives the felt enough body to be cut by your cutter.

8. Place both pieces of felt or the one piece,Appli Web Plus side down, on your cutting mat. Once again generously tape the pieces to your mat using the RNK Embroidery Perfection Tape.

9. Load the SVG file for the felt. You will need to cut 2 pieces of felt. Load two SVG felt files into your cutter. Make sure the file is on the right place to cut on your mat. Here are the settings for my cutter for felt.

10. The blade depth is a little less for cutting felt. Cut both pieces of felt and remove from mat.


Construction:

1. Score the paper on the Appli Web Pluson the back of your feltand remove the paper exposing the adhesive.

2. Center the cut piece of Deco Magic on top of one of the felt pieces, fusible side of the Deco Magic to the Appli Web Plus side of the felt.

3. Place a piece of Parchment Paper on top and press the Deco Magic to the Felt. Hold iron in place about 10 seconds to adhere Deco Magic to the felt.The parchment paper will keep the adhesive from getting on your iron.

4. Place maskon face, hold one end of elastic at one side of mask, run elastic around back of head and around to the other side of the mask. This will measure how long to make your elastic. Decrease the length about 1” so elastic will be snug on your head.

5. On the Deco Magic side and about ¾” down from the top, glue ends of the elastic to the sides of the mask using the Quilter’s Select Glue Stick.Make sure not to twist the elastic.

6. Place remaining felt piece on top of Deco Magic,fusible side to the Deco Magic and fuse. 7. Thread your machine and bobbin with the Standard Sewing thread. Install a 90/14 chrome Microtex needle in your machine.

8. Edge stitch around the entire outside edge, through all layers, catching the elastic on the sides and around the eye holes.


Optional Embellishments:

1. Choose any shapes you want to embellish your mask. I chose a bat and some stars. Try Embellish Heat Transfer Foil, Sew much Cosplay Power Shine Foil or Sew much Cosplay Power Shine Glitter to cut your shapes out of. They are both easy to weed and adhere great. They are also ok to put on knit fabrics. They stay nice and flexible. The bat SVG is included in this post.


Halloween Pillow

Halloween Pillow

Updated: Sep 1, 2020

We are getting spooky vibes with this adorable project by Clarrisa! Make your very own #halloween pillow.

Supplies:

  • 5/8 yard of fabric. I used a linen type fabric. Choose a fabric that is a little heavier. A Twill or Denim would work grea tas well.

  • Floriani Dream Weave Ultra-you will need an 18” square and 2 pieces 8 ½”x15 ¾”

  • Floriani Perfect Stick-2 pieces for a 200mmx360mm hoop

  • Floriani Stitch n Wash-2 pieces for a 200mmx360mm hoop

  • Floriani Heat n Gone topper-2 pieces about 8 ½”x16”

  • Standard Sewing thread to coordinate with fabric. Also thread to coordinate with the trims you will be stitching onto the edges.

  • Various colors of Floriani Embroidery Thread

  • Embroidery bobbin thread

  • 20-22” invisible zipper

  • Invisible zipper foot for your machine-You can buy a generic kit to use on any machine by Coats and Clark.

  • Regular zipper footfor your machine

  • 1 5/8 yards of about ½” pom pom trim.

  • 1 5/8 yards of jumbo ric rac

  • Quilter’s Select Glue stick with refill

  • 14” pillow form

  • Quilter’s Select Marker-This is amazing because you can erase the marks!

  • Quilter’s Select 24” ruler

  • Cellophane Tape

  • 2 strips of Floriani Heat n Sta Stabilizer-1”x16”

  • Quilter’s Straight pins-They are longer and work great for heavier fabrics

  • RNK Turning Tool

Download your instructions here:

Get Your Free Designs Below:

https://www.dropbox.com/sh/1bkl0fmumnd7xji/AAAhGeeb47bvaKtTm1kKCk4Ra?dl=0


See tutorial below:


Dangly Cat Toy

Dangly Cat Toy

Updated: Aug 28, 2020

We have a purr-fect project for you today! Here is an adorable cat toy by Clarrisa:


FREE BIG FISH SVG: https://static.wixstatic.com/shapes/5edfbf_411afd10249f47ff948cb75050fcbdd0.svg


Supplies:

· Two 1/8th yard pieces of Wool blend Felt

· Two pieces of Quilter’s Select Appli Web Plus- This stuff is amazing for Applique also!

· Digital Cutter

· Assorted Feathers about 4” long

· A couple of Jingle Bells

· 20” long, 3/4th wide dowel

· 1 ½ yard of small nylon cord- I found this in the Home Decorating Department for blinds

· Hot Glue Gun and Extra Glue

· Elmers Glue

· Large big eye yarn needle

· RNK Embroidery Perfection Tape-A MUST!

· Fray Block


Prepare Feather Bobble:

1. Cut a piece of felt about ¾”x3”.

2. Run a line of hot glue along one long edge of felt.Stick down 3-4 feather ends about ½” from ends and about every ½”.


2. Run a line of hot glue around entire edge of felt.

3. Being careful with the glue, roll up felt with feathers inside gluing everything together.

4. Create another feather bobble.


Cutout Fish or Object of your choice:

1. Yes you can cut felt with your digital cutter! I’ve included the SVG file of the fish with the instructions. If you don’t want to cutout a fish, choose a piece of artwork to cutout. Make your object about 2”x5”.

2. Fuse a piece of Quilter’s Select Appli Web Plus to the back of each piece of felt. Fuse it really well.


Here is a link for instructions and tips for using Appli Web Plus: https://quiltersselect.com/products/Select-Applique/Select-Appli-Web-Plus

3. Load the SVG file into your cutter. You will need 2 fish or whatever object you choose. One of them needs to be mirrored.

4. Make sure you have a clean mat. (baby wipes work well for cleaning) Stick the felt with the Quilter’s Select Appli Web plus on it Web side down. Tape around entire edge with RNK Embroidery Perfection Tape. Stick down really well.

5. For any digital cutter you will need to keep the following in mind when setting your settings for cutting felt:

· Use a deep cut blade with about a medium depth setting

· You will need to cut at a lower speed

· Increase the pressure on your blade.


TIP- I Love Floriani Craft n Cut software as it takes the guesswork out of cutting. Craft n Cut has a feature called “Save 2 Cut”. Select “Save 2 Cut” when saving your design and a window will come up instructing you on how to set your cutter for the type of material you are cutting and brand of cutter you are using.


These are the settings for my Digital cutter.

1. Cut out the 2 objects (one of them mirrored) and remove from mat.

2. Peel the paper away from the back of the Appli Web on each piece and place the objects web sides together. Match up edges and press the 2 pieces together. Appli Web is a permanent bond!

3. Cut out and fuse another object.


Attach Objects to Nylon cord:

1. Thread the yarn needle with the nylon cord. Poke the needle through the end of your fish or your object. Tie the cord in a knot around the fish. You may have to unthread the needle to tie the knot each time.

2. Thread a jingle bell on the cord. You don’t need to tie it.

3. Poke the needle through the felt at the top of the feather bobble. It will be hard to get through the felt and the glue so you will have to start the needle into the felt and push it by putting the eye down on a tough surface and push on both sides of the felt piece. Once you get it on tie another knot around the end.

4. Thread another fish, Jingle Bell and Feather bobble in whatever order you choose tying each one on.

5. Cut the nylon cord to the length of your choice leaving about 4 extra inches.


Stick:

1. Tie a large knot about 3” from the end of the cord. Wind cord around several times when tying the knot. Leave the tail.

2. If you can, cut a notch across the end of the stick. If not, tie the cord around the end of the stick. Leave the tail of the cord. In my picture I’ve put the cord in the notch with the knot on the side of the stick and glued it into the notch with Elmers glue.

3. Cut a piece of felt about ¾”x3”. Put hot glue on entire piece of felt. With the cord tail down the side of the stick, glue felt piece to end and wrap around end gluing the knot and cord tail underneath. Trim off cord tail.

4. Place a couple of drops of Fray Block on the knots to keep them tied.


Pet Placemat

Pet Placemat

We all have fur-babies that we love, but do we love the mess they can create?

If your fur-babies are like mine, they make a MESS. When it’s dinner time, there better be nothing and no one in their way because they’re coming in HOT! Food flying everywhere, water being splashed like you’re on the front row of Sea World, and the Swiffer Mop is doomed for the after math.


Clarrisa created the perfect way to have easy clean-up, adorable style, and a functional piece for you and your fur-baby! How about a waterproof pet placemat? Download your instructions below with examples of software or follow along in the video and steps listed.


Supplies:

· Floriani Total Quilter Software

· Various pieces of fabric for piecing- I found that pieces 12”x12” or 12”x9” were about what I needed for each piece

· Floriani Decorative Embroidery Thread or Floriani Standard Embroidery Thread

· Bobbin thread

· Floriani No Show Mesh Non Fusible- 4 hoopings in 200mmx300mm hoop

· Quilter’s Select Appli Stick or Embellish Foolproof Repositionable Webbing

· Digital Cutter (optional)

· Craft n Cut Software or Software for your digital cutter (optional)

· 1 ¼ yard of 20” wide Fusible Matte Vinyl

· 3/8th yard of fabric for back

· Teflon Pressure foot for your machine

· Open Toe Applique foot for your machine

· Standard Sewing thread to coordinate with your fabrics

· RNK Perfect Grip Tape

· Quilter’s Select Glue Stick

· 1” wide Wet n Stick Tape

· 90/14 Chrome Microtex needle


Create Appli Quilt Block:

1. You will be using Floriani Total Quilter to prepare your Appli Quilt Block. Watch attached video for a software lesson on how to create your design. You will need to create a block that is 6”x11”.

2. Once you save your design in Total Quilter it will save multiple files. The main files you need are the SVG files for cutting if you choose to cut your pieces with a digital cutter and an embroidery file for stitching the placement lines and connecting stitches.


Cutting out your pieces:

1. You will use the SVG files generated when you exported the Appli-Quilt block in Total Quilter to cut out your pieces.

  • Before cutting your pieces you will apply Quilter’s Select Appli-Stick or Embellish Foolproof Reposition-able Webbing to each piece of fabric before cutting.

  • The pieces may be cut using a digital cutter or you can check in the print options “For Manual Cutting” at the bottom of the Export Window in Total Quilter.The Export window comes up when you click the “Export AQ Quilt Block” icon.

To manually cut each piece-If you don’t have a digital cutter you will have checked “For Manual Cutting” and “Print Preview” in the Export Window. A window will appear for you to print a pattern for each piece. You also have options to print a picture of the entire block and the stitching order. I print the picture of the block but it’s up to you if you want to print the stitching order. I don’t find it necessary.


Before cutting your fabric, fuse Quilter’s Select Appli Stick or Embellish Foolproof Reposition-able Webbing to the back of each piece of fabric.


  • Since we are making 4 blocks, it would be best to cut all pieces at once. If you have digital cutting software it’s easiest to put multiples together in your software. This is a picture from Floriani Craft n Cut software with multiple pieces on the cutting mat. Save this file as an SVG file and cut with your digital cutter.

TIP- I Love Craft n Cut software as it takes the guesswork out of cutting. Craft n Cut has a feature called “Save 2 Cut”. Select “Save 2 Cut” when saving your design and a window will come up instructing you on how to set your cutter for the type of material you are cutting and brand of cutter you are using.


If you don’t have digital cutting software you will have to load multiples into your cutter and arrange them on the screen of your cutter.


Embroidery:

1. To keep the No Show Mesh from slipping in the hoop, I like to wrap the long side of my inner hoop with RNK Perfect Grip Tape. It is purple on the hoop in the following pictures.

2. Hoop a single layer of Floriani No Show Mesh.

3. The embroidery design exported from Total Quilter will embroider a placement line.Each step in the Appli Quilt process is a different color change.You will use the same thread for the entire embroidery process.Stitch the first color which is the placement line.

4. Remove the hoop from the machine. With a stiletto or straight pin, score the paper on the back of each cut piece and place each piece in the appropriate place on the No Show Mesh.

5. Once all the pieces are placed, press the pieces down to adhere them well to the No Show Mesh. LEAVE IN HOOP.

6. Replace the hoop and stitch the decorative connecting stitches.

7. Remove from hoop and trim away the No Show Mesh along the edge of the fabric.


Construct the Placemat:

1. Lay the 4 blocks together in the positions you would like them.

2. Turn 2 blocks to the back keeping them together and stick a piece of Wet n Gone tape where they meet holding them together.We are butting the blocks next to each other instead of stitching a seam. Repeat for 2 additional blocks. Just tape and stitch 2 blocks at a time.

3. Turn blocks to the front. Thread your machine with your decorative thread on the top and bobbin. Insert 90/14 chrome Microtex needle. Attach your open toe foot.

4. Select a decorative stitch to stitch the 2 blocks together. Select a stitch that is as wide as your machine will stitch and make sure it’s not too dense.

5. Using your selected decorative stitch, stitch the 2 blocks together catching both blocks with the width of your stitch.

6. Tape and stitch all 4 blocks together.

7. Square up all 4 sides of the entire piece. Lay your ruler along one edge lining up the ruler with the top and bottom of that edge. Cut off any extending fabric. Repeat for all 4 sides.

8. Lay the connected 4 blocks (top) on top of the backing fabric and cut out backing fabric to match.

9. Cut 2 pieces of Vinyl about 1” larger all around than the 4 connected pieces (Top).

10. Follow the instructions that came with the Vinyl and fuse one piece of vinyl to the top and one to the back. BEFORE FUSING, trim off the extra vinyl around the edges.

11. Thread your machine top and bobbin with standard sewing thread. Attach teflon foot.

12. Place back and top right sides together and pin around the edges within the ¼” seam allowance.

13. Toward about the center of one long edge begin stitching off the fabric into the seam allowance and pivot at ¼” seam allowance and continue stitching. See photo. Leave about a 6” opening to turn. At each corner stitch 2-3 stitches across the corner and then pivot and stitch the next side.

14. Trim corners at a 45 degree angle curving around the corner.

15. Turn right sides out and using the RNK Turning Tool push the corners out. They won’t be too square as we stitched the 2 stitches in each corner. Finger press seam allowances to one side and fold along seam line. DON’T PRESS THE VINYL.

16. Run a line of Quilter’s Select glue INSIDE along one open edge. Turn the ¼” seam allowance onto the glue. Repeat for other edge.

17. Set your machine for a wide and long zig zag. I set mine for 7 and 7.

18. Zig Zag around the entire edge of the placemat holding the opening edge together while you stitch. Don’t pull as you stitch. You may have to pull a little from behind to keep things moving forward.