Quilted Placements

Quilted Placements

Updated: Jun 8


Hi, I’m Susan from Sewfeet.com and this post is about a product from RNK Distributing. It’s called Sew-Fab-Foam and I’m using it today to make quilted placemats. I use it in place of batting, and it makes the placemat sturdy plus when I quilt through it, the stitching is more defined than stitching with a low-loft batting. The “wrap-around” binding technique makes it easy to finish these placemats.


Supplies for One Placemat – Finished size: 17” x 13”


· Front of placemat: Twelve 5” squares of quilting cotton


· Backing/Binding of placemat: 20” x 17” rectangle of quilting cotton


· Sew-Fab-Foam: 17” x 13” rectangle


· Temporary spray adhesive or Quilters Select Free Fuse


· Quarter Inch Presser Foot


· Open Embroidery Presser Foot


· Quilting/Seam Guide


· Fabric Marker – I used the Quilters Select Self Erase Marker. It has a strong mark that disappears in 1-3 days.


· Sewing clips


Piecing the Placemat Front


Using a quarter inch seam allowance, stitch three rows of four 5” squares together. Press the seams open. Stitch the three rows together to form the front of the placemat.


Sew-Fab-Foam


This foam stabilizer is sandwiched two pieces of natural color tricot fabric. One side is fusible so you can fuse the fabric to it and then quilt with no shifting or puckering. It can be machine washed and dried, so it is perfect for these placemats. Fuse the pieced fabric to the Sew-Fab-Foam by placing the fabric wrong side down on the fusible side of the foam. Set the iron on a medium setting (Wool) with steam. Hold the iron in place on the fabric for at least 5 seconds to bond the fabric to the foam.


Crosshatch Quilting


Draw a diagonal line in each direction on the placemat, using the diagram as a guide. Attach the quilting guide to the presser foot, 1” from the center of the foot. Stitch along one drawn line. Place the quilting guide on the first line and stitch a second line. Continue stitching lines 1” apart until the placemat is covered in one direction. Repeat the process with diagonal lines in the opposite directions. Trim the edges slightly if needed to square up the placemat.


Backing


Place the backing fabric on the non-fusible side of the foam. Center the exposed side of the foam on the wrong side of the backing fabric with 1 ½” of the backing extending beyond the foam on all sides. This will result in a ¾”binding on the placemat. Use temporary spray adhesive or pins to hold the placemat and the backing together.


Wraparound Binding
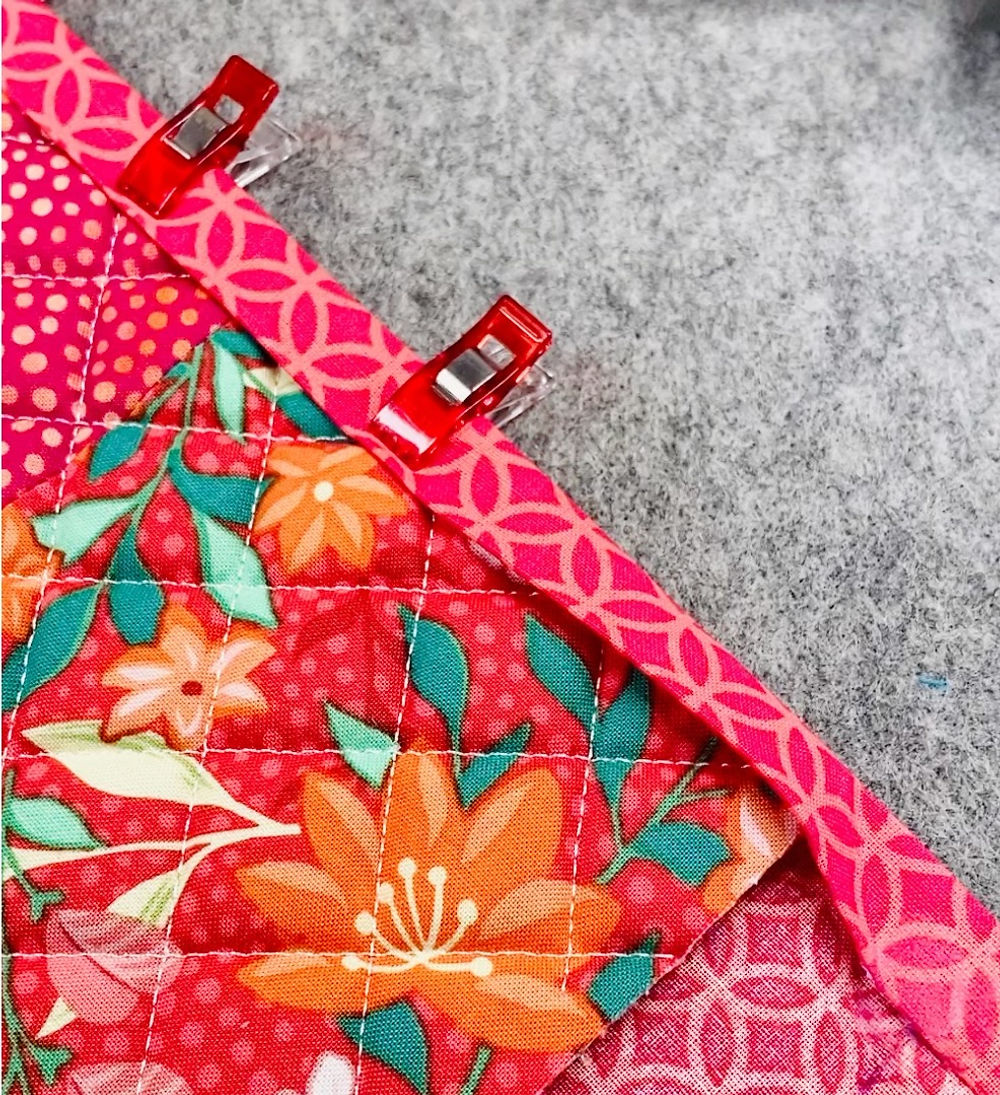


The excess backing extending from each side of the placemat will wrap around the raw edges of the placemat and become the binding with block corners. This fast binding method is simple to learn and an easy way to bind a quilt. On one side fold the excess fabric in half so the raw edge of the backing meets the raw edge of the placemat; press. Fold the binding up more time, folding it over the edges of the placemat so it is on the front of it. Use sewing clips to hold it in place. Repeat with the opposite side.


Stitch the binding using the open embroidery foot. Guide the edge of the binding along the inside toe and adjusting the needle to stitch about 1/8” from the folded edge of the binding.


Repeat this same process for the upper and lower edges of the placemat folding and stitching the corners as shown in the photo below.


Napkin Tip


Make coordinating napkins by cutting 18” squares of the backing fabric and stitching a narrow hem on all four sides of each one.


Mother’s Day Apron

Mother’s Day Apron

Updated: Jun 8

Clarrisa’s Corner April 27

Join Clarrisa Gossett on the Floriani Facebook page for this fun, fast Mother’s Day Apron. Learn to create large text embroidery and how the weight of your thread can affect how accurate your piecing is!


Scrappy Comfort Quilt

Scrappy Comfort Quilt

Hi,


I’m Susan from sewfeet.com and in this post, I want to share my latest quilt project. In one corner of my office, I have a little retreat where I can read, watch the birds outside, or just slow down and take a break now and then. I call it my comfort corner and I love the look and feel of it. But I decided it was missing one thing. I just needed a lap quilt to make it perfect. So, I put together a quilt made of scrap fabric, and I love how it turned out. The finished size is 32” x 53” and here’s what I used to make the quilt.


Supplies


· 16 fabric strips, 2 ½” x 55” – the length of the strips give you a little room to trim the edges once the strips are sewn together


· Backing fabric, 38” x 58”


· 2 ½” wide bias binding, pieced to be 174”


· Embellish Angel Loft Bamboo Batting, 36” x 58”


· Cotton or Polyester thread to coordinate with the strips


· Walking Foot


· Rotary Cutter, mat, and ruler


Rotary Cutter and Ruler


I have a lot of scraps but of course, none of them are 55” long, so I pieced them to make the length I needed. I started with a few leftover pre-cut strips, and then used my scraps to cut more strips. I used my Quilters Select ruler and rotary cutter. The first time I used a Quilters Select rotary cutter, I couldn’t help but notice that it is much heavier than any other cutter I had used. I wondered if it would be hard to use or maybe it would be tiring to my wrist and hand. It is really exactly the opposite. The weight of the cutter makes it easier


to cut fabric because you don’t have to press as hard – the cutter is doing the work for you! I was able to cut all of the strips I needed in a very short time. The Quilters Select ruler I used made it really simple to cut 2 ½” wide because that is the width of the ruler. It also has a non-slip coating on the back, so it doesn’t slide around on the fabric as you are trying to cut it. The length of this ruler is 36”, so it is actually an acrylic yard stick! Note: I used this same ruler to but my binding strips.


Piecing the Strips


Once I had cut a variety of strips from my scraps, I pieced them together to make eighteen 55” strips. I did this by laying the strip pieces on my cutting table and deciding which pieces to stitch together to make the long strips. (My table held about half of the strips I needed so I did this twice to get the total number of strips I needed.) I didn’t overthink this. The only thing I did was make sure that the darks and lights were mostly separate. I had short strips and long strips that I sewed together to make 55” long strips.


I pressed the seams to one side and started sewing them together to create the quilt top. I used a patchwork presser foot (quarter inch), but you can use an all-purpose foot if you want. You really don’t need to be fussy about ¼” seams. You are not trying to match anything, just making a large rectangle, so if your seams aren’t perfect, the quilt will still be beautiful. Once the strips are joined, press the quilt top and trim it to 32” x 53”, squaring it up as needed.


Making the Quilt Sandwich


Once you have a large rectangle, you are ready to layer the quilt top and the backing with the batting between them. The backing and batting will extend beyond the edges of the quilt top. I used the Embellish Angel Loft Bamboo batting. This is a blend of cotton and bamboo. It is different from 100% cotton batting because it is slightly thicker and very soft. This means that it has a beautiful drape and feels very cuddly (remember, it is for my comfort corner). Baste the layers of the quilt using your favorite basting method. CLICK HERE for instructions on using Free Fuse, a fusible powder that is great for basting quilt layers together.


Machine Quilting


Attach a walking foot to the machine for quilting. Because this quilt has random patchwork pieces, it is great for all-over quilting that isn’t specific to the patchwork pattern. I used one of my favorite decorative stitches sewn vertically on the quilt. It is a serpentine stitch that looks beautiful and creates great quilted texture on the quilt. I started by sewing a line of stitching on each vertical seam. I began at the top of the quilt at the center seam line and worked my way out to the side edge. I continued on the opposite side, again working my way out to the side edge. This is really enough to hold the layers together so you can stop there if you want.


I wanted a more quilted look so after stitching the seam lines, I went back and stitched down the center of each strip. I did not measure the spacing for any of this (but you may if you want it to be consistently spaced). One of the things I like about this stitch is that it looks good, even when it is not placed perfectly).


Binding


Fold the binding strip in half lengthwise and press. Starting on the lower edge of the quilt, stitch the binding to the front of the quilt, mitering the corners. Wrap the binding to the back of the quilt and secure it with machine or hand stitching.


est